It's been a rainy week here at Poppy Corners, and it's January, so not much is happening in the garden.
For this week's walkthrough, we're talking about beer. Tom walks us through his all-grain homebrew setup, and brews up a batch of amber ale.
Your Custom Text Here
It's been a rainy week here at Poppy Corners, and it's January, so not much is happening in the garden.
For this week's walkthrough, we're talking about beer. Tom walks us through his all-grain homebrew setup, and brews up a batch of amber ale.
Guest post from Tom today...
This past weekend Adam and I celebrated his birthday early by taking a pasta and gnocchi class with Angelo Garro in San Francisco. Sicilian by birth and a blacksmith by trade, Anglo's Renaissance Forge has become a gathering place for people that enjoy food prepared in traditional ways. Long-time readers of the blog will remember that I took a salumi class with Angelo some time ago, and enjoyed it immensely.
We gathered at 10AM for some cappuccino, pastries, and introductions, then got right in with the preparation of doughs. The pasta dough is a simple combination of flour, semolina, egg, and enough water to bind it together. We then rolled it down to thickness and hung it up to dry for a bit.
For the gnocchi, we put potatoes through a ricer, then mixed with flour, semolina, egg, and water to make a dough. This was then rolled by hand, dusted generously with flour, and set on trays and chilled.
All this work required some sustenance; Angelo obliged with some of his homemade salami, prosciutto, and pancetta, along with some of his own wine.

The pancetta was eaten too quickly to be captured in this picture.
After the sheets of pasta dried for a bit, we sliced them up into linguine.
The gnocchi was cooked and blended with some tomato sauce and meatballs. The pasta was mixed with a tomato-mushroom sauce and some fresh ricotta Angelo made. Then it was time to eat!
It was a wonderful time, and Adam and I both learned a lot. Two things in particular struck me during the day.
The first was when we started peeling potatoes. I've taken more than a few cooking classes over the years, and maybe it sounds silly, but it was so nice that there was an assumption of basic competence in this class. Here's some potatoes, here are some paring knives, get cracking. I work in education, and I see the benefit of setting high expectations. Sure, the adults in the class all had more cooking experience than Adam, but by just treating him as someone who could do the basics, he rose to the occasion.
The other was the value in cooking together. I've tried making pasta myself from time to time, but always with just meh results. Recipes and YouTube videos can only take you so far; there are some things you need to work on with an expert. It's not so much the ratio of flour to semolina to egg that you're learning, it's the way the dough should feel at each stage, the shine that the sheets take on as you roll them, the way to get a clean edge, the size and shape of the gnocchi.
Much thanks to Angelo, Veronica, and Beth at Omnivore! Now, on to buy some semolina...
Guest post by Tom today:
On Saturday I attended The Whole Pig, a class on pig butchery sponsored by the Institute of Urban Homesteading. I've taken classes with them before (cheesemaking), and we were a stop on their farm tour last year. Our instructor for this class was Seth Peterson, who lives in Berkeley and has worked in a variety of restaurants.
(Note: this post will contain pictures of pig parts. It mostly won't be anything you haven't seen in a grocery store, but if this isn't your thing, perhaps you'll want to read an archival post on shallots or bees instead.)
The pig we worked with was from Devil's Gulch Ranch, an 873 acre farm in Nicasio, CA, in Marin County, pretty close to the Point Reyes National Seashore. They supply pigs to all kinds of high-end restaurants in the area, but they'll also sell to regular folks.
We started our class with a discussion of knives and knife safety.

It's such a delight to use really sharp knives. That's a bone saw, too.
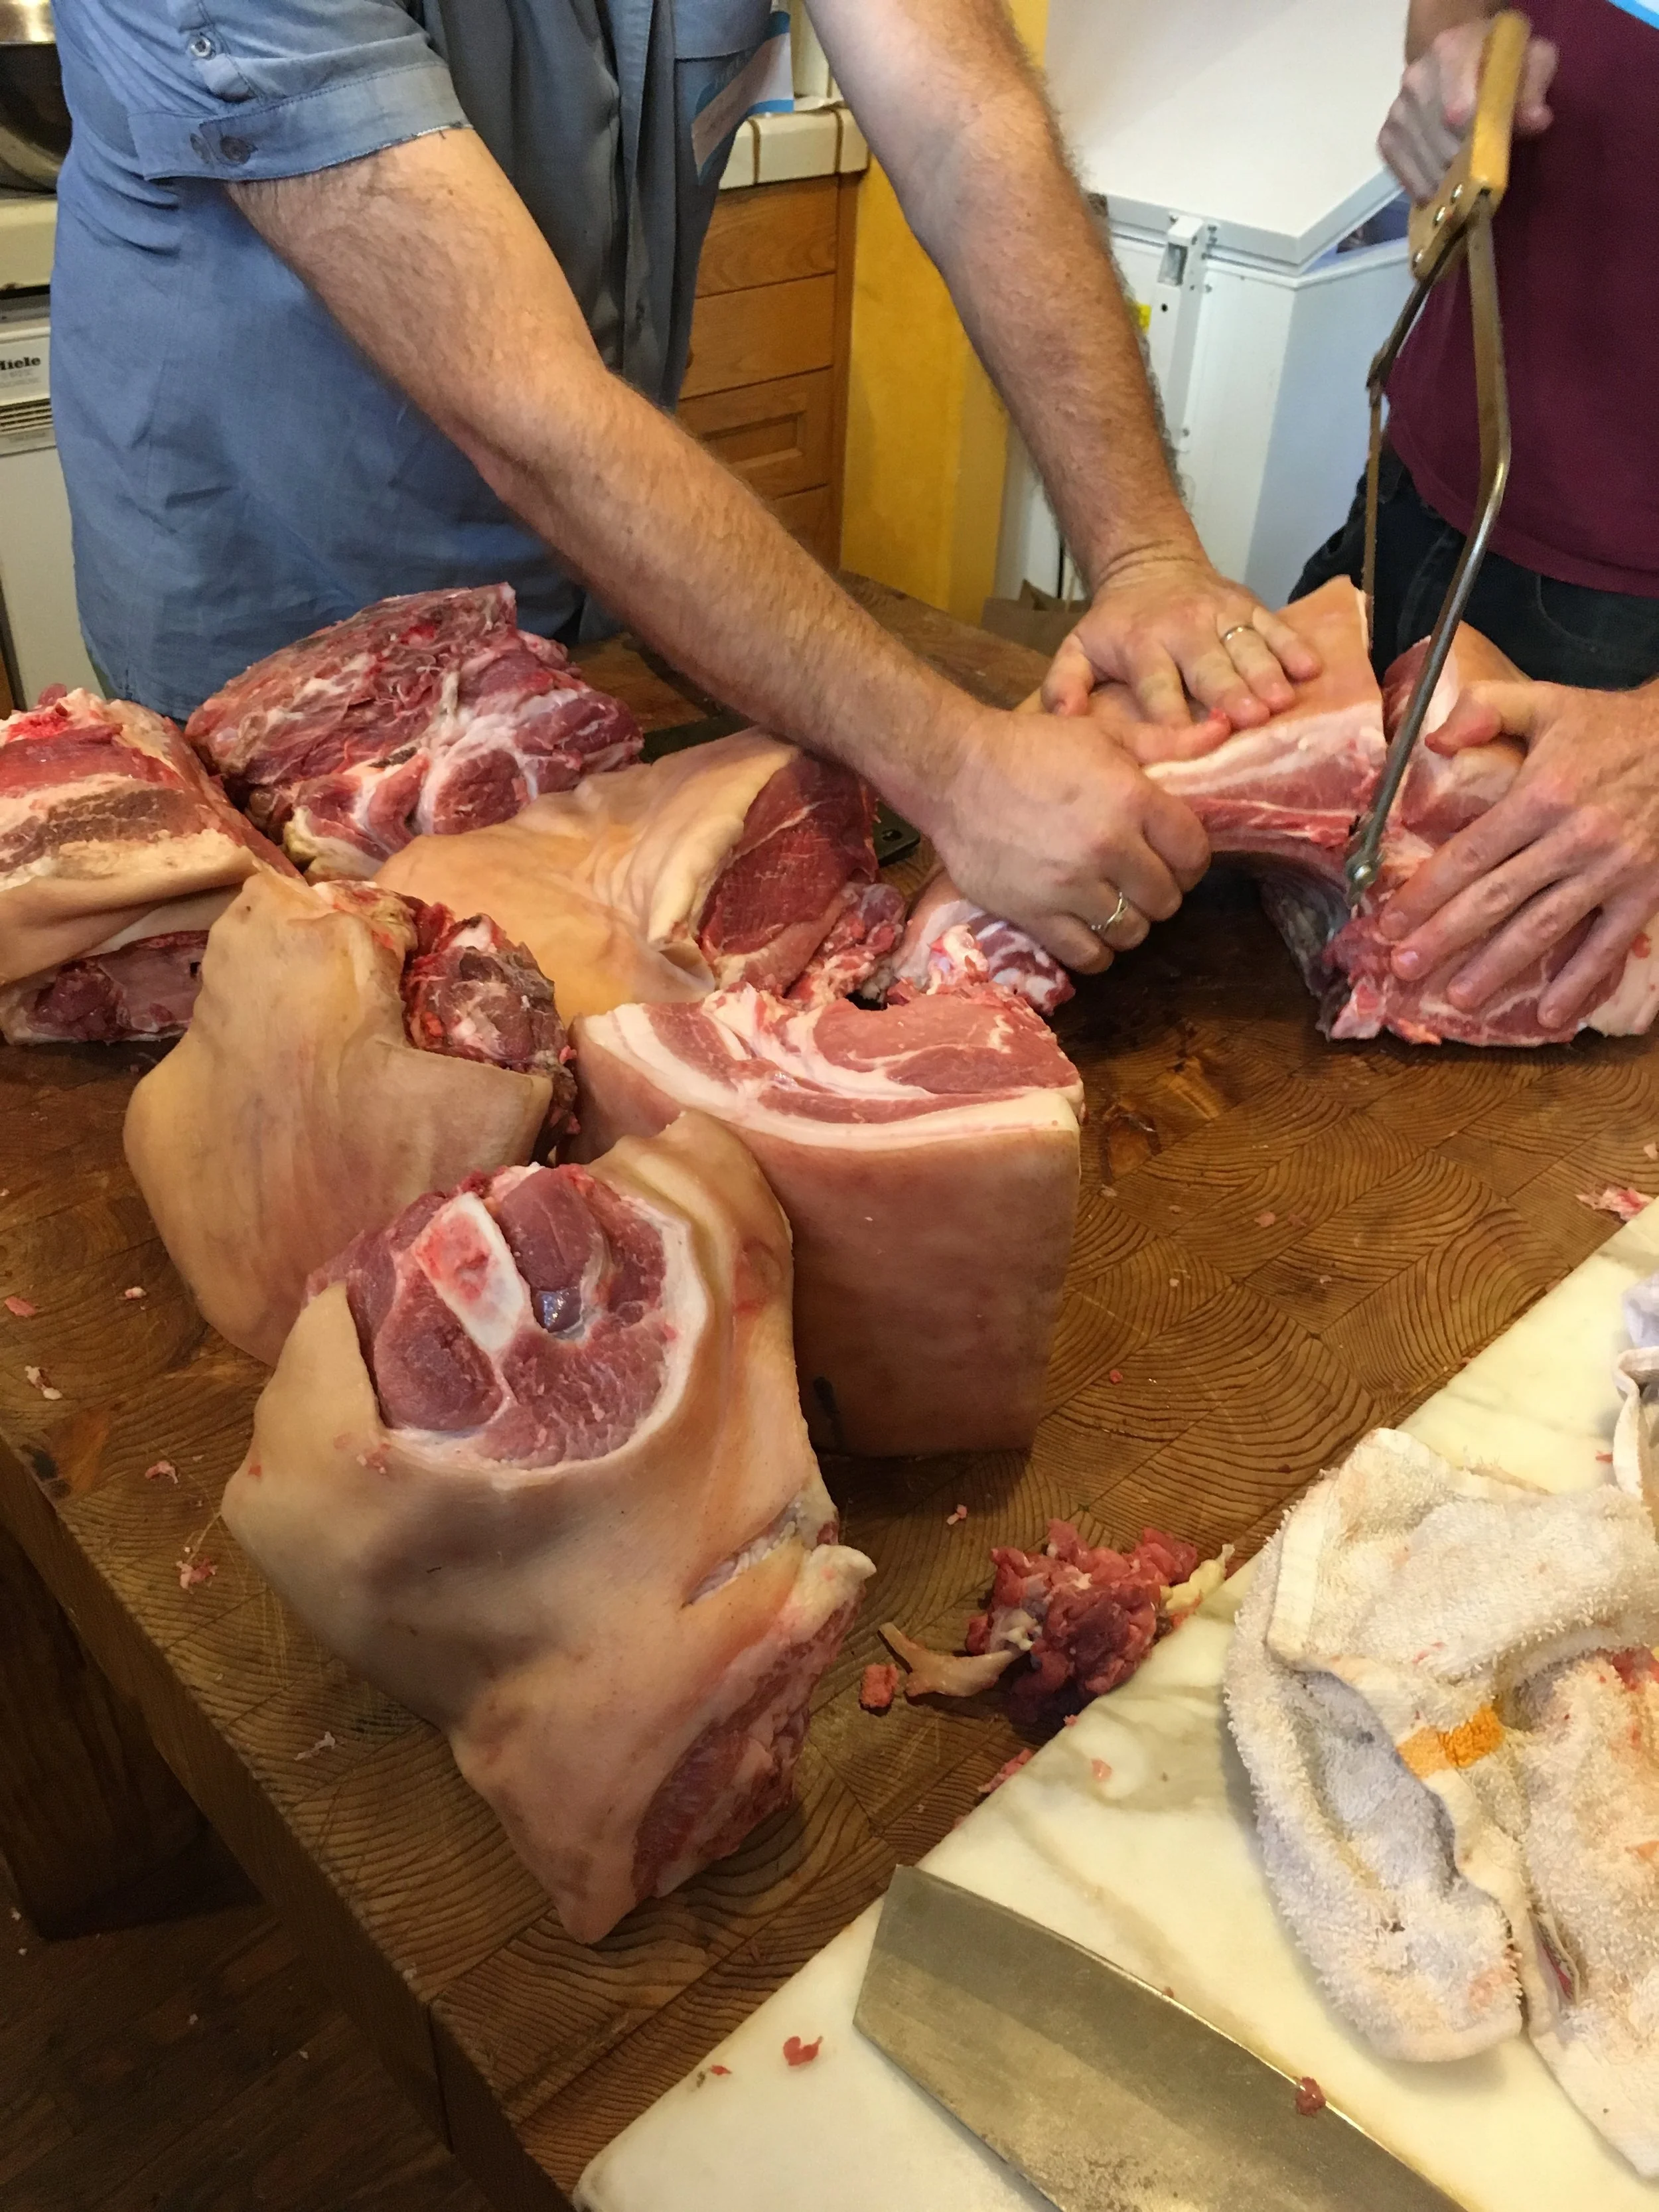
The pig came in two halves, or sides; Seth had picked it up the day before, and it spent the night in the big spare freezer he keeps in his house. We next talked about how we were going to break down each side into its four quarters, and then take each quarter and break it down into the different parts you're used to seeing. For those of you counting at home, yes, one pig gives you eight quarters.
Before separating it into four quarters, we had to prep each side, which involved removing the hangar steak and skirt steak, the leaf fat (internal fat that's really good for pie crust) and the tenderloin.
Next, we removed the leg quarter (the hind leg and back side) and the shoulder quarter (with front leg) from the midsection. The midsection is then cut in half, into the loin (around the spine) and the belly (mmm, pork belly). Here's a good picture:

Shoulder quarter on the left, leg quarter on the right, and a classmate separating the loin and belly.
Here's a closeup on the loin and belly, pre-separation:

Soon-to-be pork chops on the left, belly on the right.
A big part of the rest of our discussion was on the choices a butcher has to make. Consider this picture of the belly and loin, post-separation:

We'd made the choice to cut where we did to kind of maximize belly, but had we cut a little further down, we'd have loin chops with that bit of rib on the end. See all that back fat on the loin? You might think about separating that out if you were going to make salumi. When separating the ribs from the belly, you've got to decide how much meat to leave on. With the loin, you've got the choice of cutting them into pork chops (which is what we did), but you could also cut a big section to make a loin roast.
Once quartered, we got to work on breaking things down. We decided to make pork chops:

The leg and shoulder quarters were separated out into roasts.
And the belly was cut into squares so we could all take some home.

Seth, our instructor, was wonderfully enthusiastic with us. We were all a little nervous about the process, and he was very encouraging about us just getting in there and cutting things. Our cuts were by no means expert, but it all worked out. We each got to take home 10 pounds of various pig parts -- some belly, a chop, a bit of ham hock and leaf fat, either some tenderloin or some ribs, and then some roasting bits. I cooked up a variety of our take for Sunday dinner.

Cooking up a pork chop...

Ribs, chop, and roast.
A couple of takeaways:
If the only pork you're eating is tenderloin, that's maybe 3-4 pounds out of a 180-pound pig.
Seth paid $3.50 a pound for the pig, which is astoundingly inexpensive. This whole experience definitely made us think about going in with a few people and doing this ourselves. You need some pretty significant freezer space to store half a pig, but knowing exactly where and how your pig lived, and getting money directly into the hands of farmers, makes a lot of sense. (Two of my classmates were a couple that just started New Growth Farm in near-to-us Castro Valley, so we'll have to check them out).
We watched some video from Farmstead Meatsmith in preparation for class. This video about side butchery gives you all of the basics.
Joe the dog thought I smelled fabulous when I got home. He would have enjoyed this class, too.

You gonna eat all that?
Here it is.
Six half-pints (plus another quarter pint in the cupboard now) of lovely, golden honey. The best part is, we didn't expect it. And we're totally out of honey, so it couldn't have come at a better time.

Tom asked that we save the beeswax and render it, so I did some research on that. I finally found a method on a blog called Montana Homesteader that sounded doable.
First, I gathered the leftover wax into a cheesecloth package, securing it at the top with a rubber band.

Then, I plopped this whole parcel into a large pot of water which had been heating on medium-low for a while.

I probably let this go for about an hour, just on that low heat, while the wax melted out into the water, and the cheesecloth held on to the bits of bees and other gunk that was stuck in the wax. Then, when I thought it was close to done, I used tongs to smush the cheesecloth together and squeeze out all the melted wax. I threw that cheesecloth away. Then, you just have to let the pot sit and cool. The wax rises to the top and forms a disc floating on the water.

When it was totally cool, I ran an offset spatula around the edge of the pan, scooped out the disc (breaking it, darn) and put that on several thicknesses of paper towel. I then scooped out any random bits and pieces of wax and added them to the paper towel.

It's pretty, isn't it? Maybe we'll melt this down further and make it in to a candle or something, but I have to say the clean up from rendering wax makes me never want to do it again. Beeswax melts easily, so I just warmed up the utensils I was using over a hot burner flame (gas) and then wiped off the melted wax with paper towels. The pot was warmed over the burner and then wiped out with many, many paper towels, then given a coat of coconut oil and wiped again for good measure. This uses a lot of paper towels that can't be put in the compost, but on one beekeeping forum a guy said he uses these for lighting his smoker. This is a good idea, but I don't use the smoker very long, as I only have one hive to check, and I don't like the idea of melted wax all over it. So I just threw the paper towels away, guiltily.
If one was going to make a habit of rendering beeswax and melting it, one might consider getting a dedicated set of tools. Ahem.
I forgot to show you a picture of the new birdhouse we got, a gift from my parents who visit Williamsburg every year. This is an authentic Williamsburg-era birdhouse. Tom installed it behind a cover of ceanothus, as we find the birds are more likely to use houses we give them if they are behind cover.

One more thing I wanted to share with you today: I tasted the olives in that extremely salty brine I made, and holy shrunken tastebuds, it's waaaaay too salty. So I drained all the olives, rinsed them thoroughly, washed the containers, and made a new brine using a recipe I found on the UC extension preserving website. It involved a little salt, some red wine vinegar, and water. I re-packed the olives in this brine, again with herbs and garlic, and with a thin layer of olive oil on top. These will keep for a year at 60-80 degrees.
Ha ha. The game is on here, but we're not really watching it. It's been an interesting week in San Francisco with pre-game events and concerts, all of which we've largely ignored. There's been controversy about the homeless of SF, of which there are way too many, and 'where to put them' so the tourists wouldn't be affected in any way. To be frank, I'm tired of going to the morning paper and seeing Super Bowl news. Today at least, the hoopla is down closer to San Jose, about an hour/hour and a half south of us.
Anyway, our list of chores didn't change any. We still had all kinds of stuff to accomplish in the garden and kitchen, and it all got done. Since it's a beautiful day, we decided to open the hive and see how the bees were faring. Over the past week (sunny and warm) I had noticed some limited activity, and I wanted to make sure the bees were ok.
I tried this trick Dad said he uses, which is to set a timer for a minute and count how many bees come back to the hive (after foraging). He has two hives; one is very strong, and he had 30 bees come back within a minute. His other hive, which he thought he lost this winter, had 10 bees come back within a minute. Me? I had 5 bees come back. So I was a little nervous about the state of the colony.
But what we found was very encouraging. We really have very few bees, I mean it seemed like maybe a hundred (though I'm sure that's wrong). However we found the queen, we found a small bit of brood, we found plenty of honey still in the hive (and several bees were eating it) and new pollen being packed in to cells. So while they are extremely diminished in number, they are also beginning to recover.

House bees working near the brood

Sorry so fuzzy, but that's the Queen up top. She moves fast and it's hard to focus before she's gone!
We rearranged some bars, moving those full of honey up close to the cluster. We saw an opportunity to take out some old bars on which the bees had built comb sideways (it's been a pain to work around these bars since last spring), as they were at the back of the hive and being completely ignored. As I've said before, bees won't travel to the back of the hive in cold weather, as long as they have enough honey nearby - they need to stay warm in the cluster. Now was the time to take these bars out of rotation.
And that meant we could have the honey from those bars!


We cut the comb off of five bars, dropping it in to bowls lined with colanders. We soon realized that this wouldn't be a large enough solution, so Tom ran to the hardware store and picked up two buckets, then drilled holes in the bottom of one bucket, making an impromptu drainage system that I think we will probably now use forever.

Tom drilled the holes, then I washed the buckets with soap and water.

Stacked one on top of the other, there's a good half foot between them inside.

Crushed comb goes in the top layer...

... draining in to the bottom. Simple!
This was a totally unexpected benefit of opening the hive today. How lovely that the colony made so much honey last summer that they still have plenty to eat, and extra to give to us!


