• About
  • Blog
  • Contact
  • Favorites
  • Archive
Menu

Poppy Corners Farm

Street Address
Walnut Creek, California
Phone Number
Walnut Creek, California

Your Custom Text Here

Poppy Corners Farm

  • About
  • Blog
  • Contact
  • Favorites
  • Archive

Making Grape Juice

October 4, 2023 Elizabeth Boegel

In my school garden, we have an extremely vigorous grape vine. It is practically covering the fence from one side of the property to the other; it’s beautiful in three seasons, producing nice flowers in spring, prolific fruit and green leaves in summer, and flaming red leaves in fall. My guess is that this variety is ‘Roger’s Red,’ which is a hybrid of our native California grape. The fruit is tasty, although quite seedy.

This year, the grape grew to gigantic proportions, produced an incredible amount of fruit, and has made the wildlife around the Environmental Center very happy (we have a turkey family nibbling the fruit each day, and the human wildlife is also happy taking home bunches of fruit after class). My co-worker decided that we needed to harvest as much fruit as possible and give the vine a good pruning, which it likely hasn’t had in 30 years. So, our student gardener has taken on that project, and the other day harvested two enormous buckets of grapes.

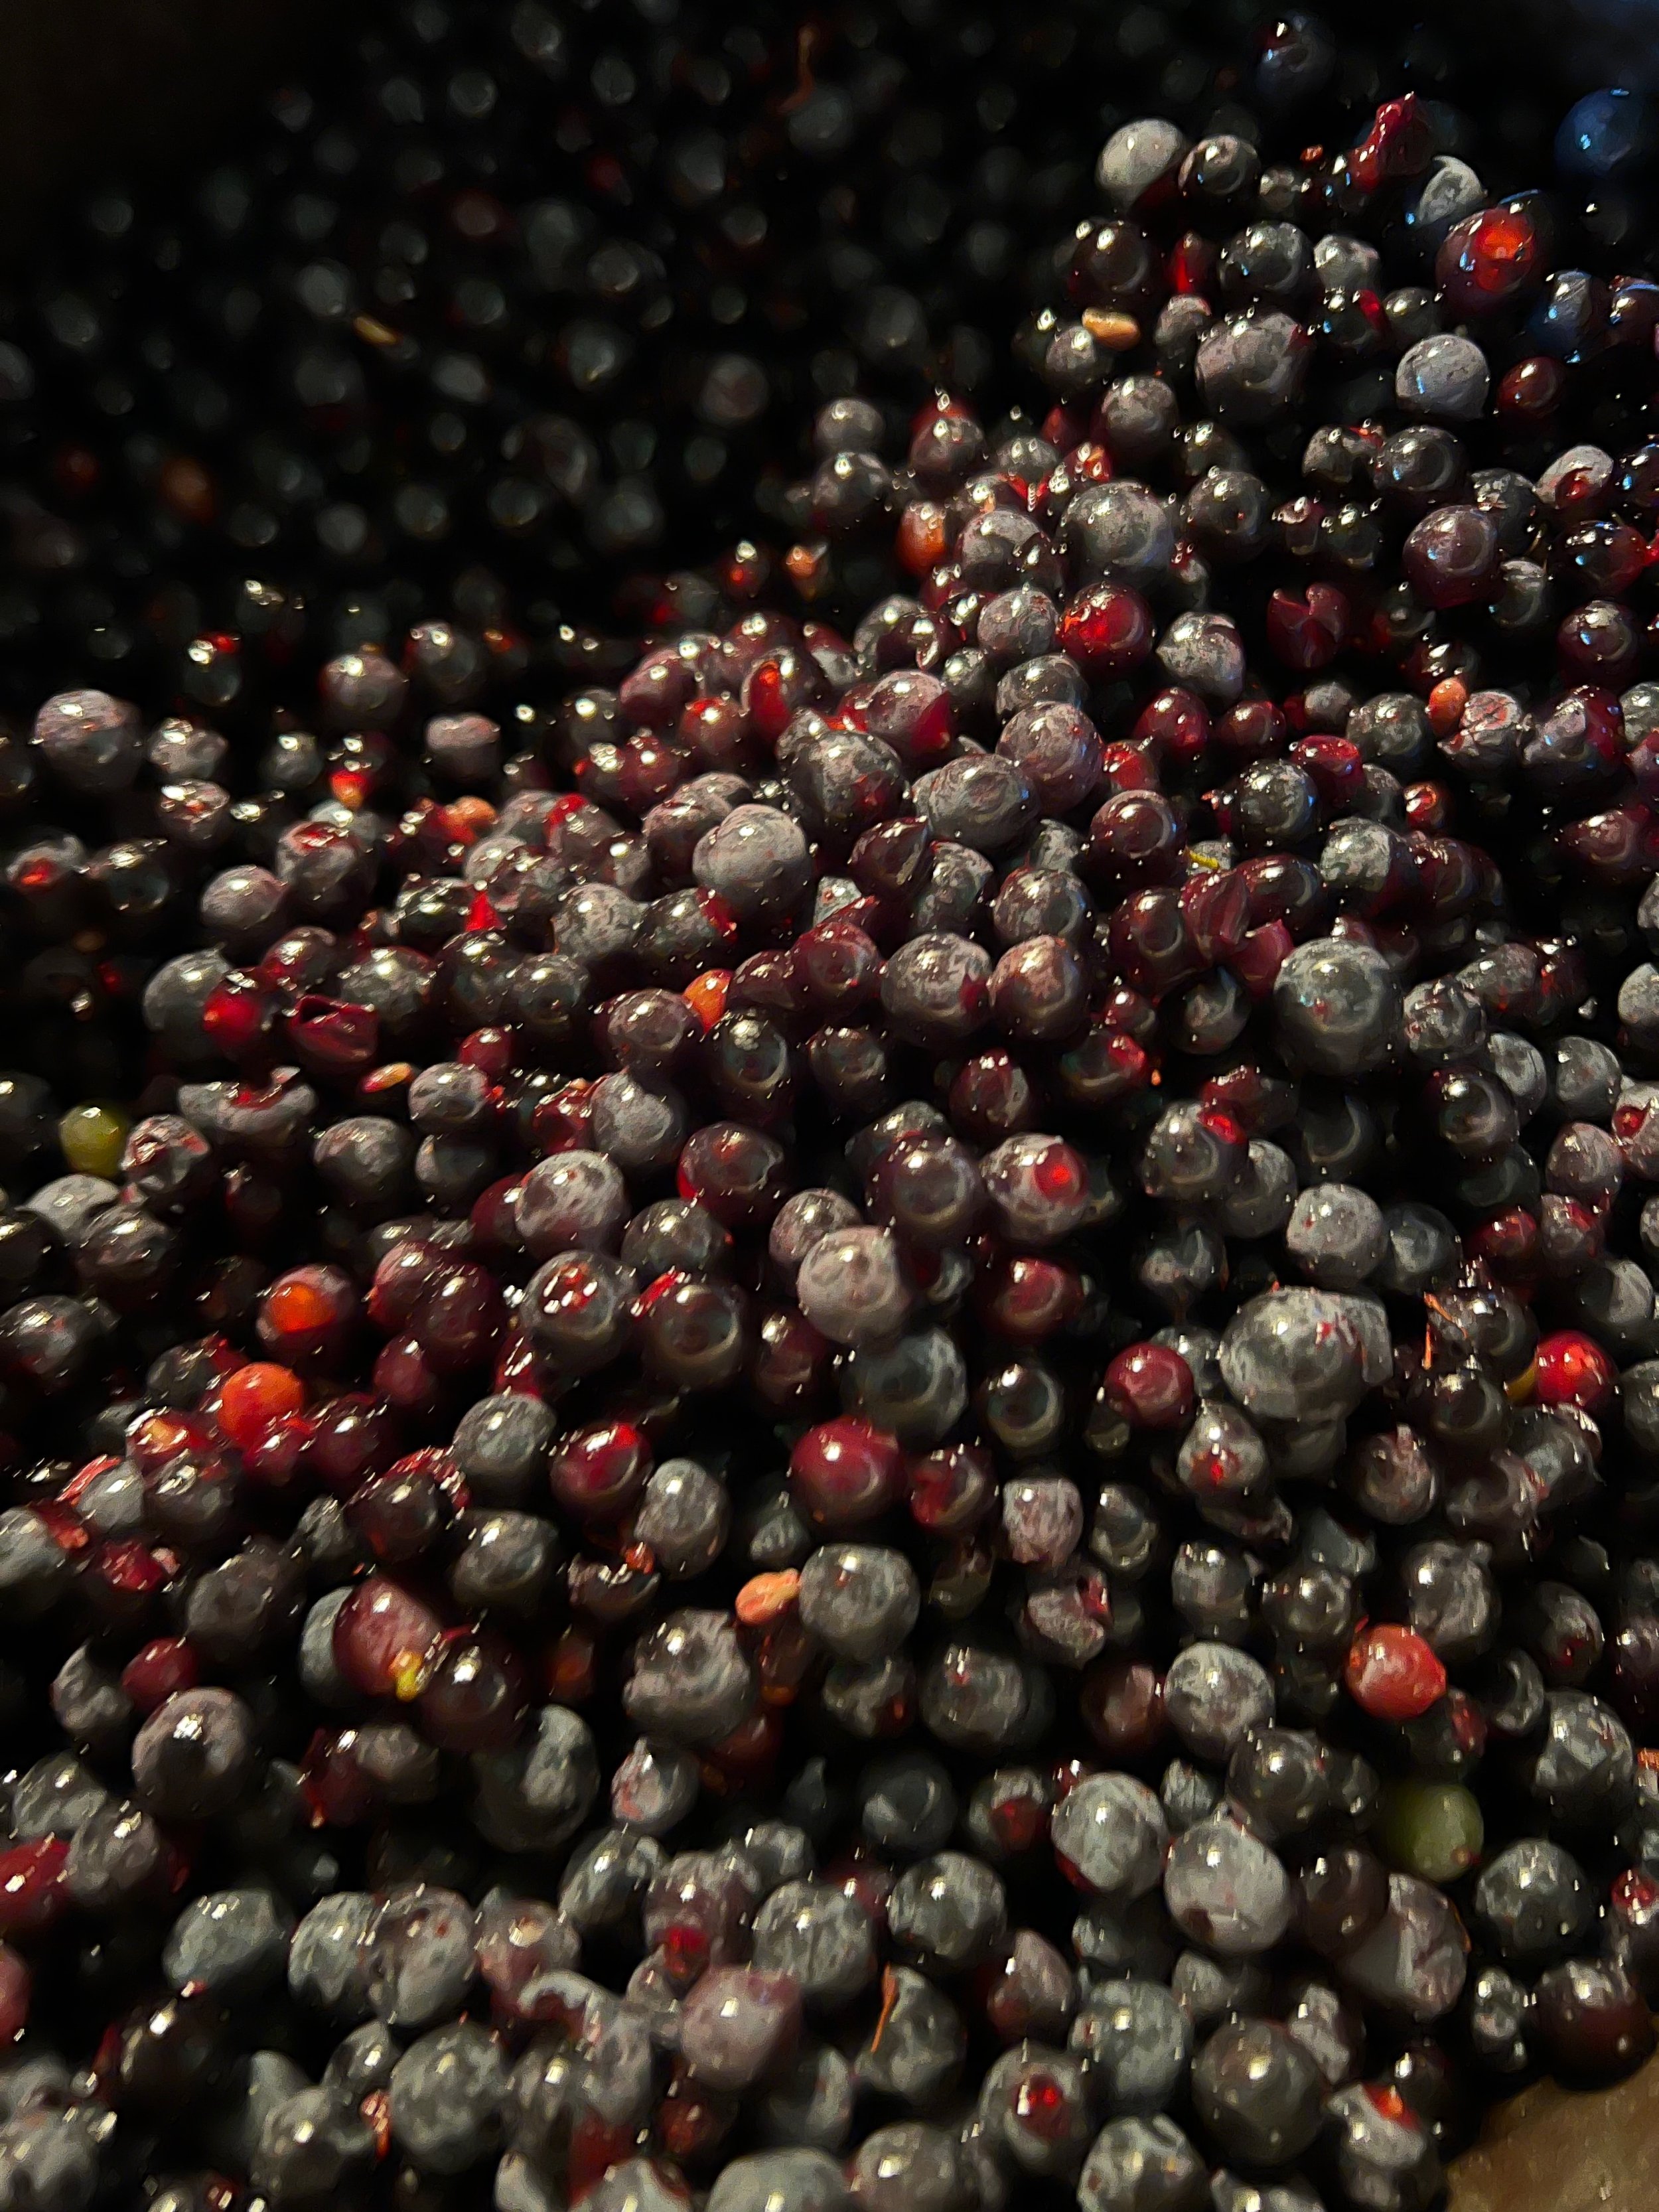
I decided to bring the grapes home and see if I could make some decent juice from them. I didn’t have high hopes for this project because the grapes are really small, the size of blueberries (small ones, not those giant inflated ones you find in big supermarkets), and they are nearly all seed. I was sure they wouldn’t yield much juice.

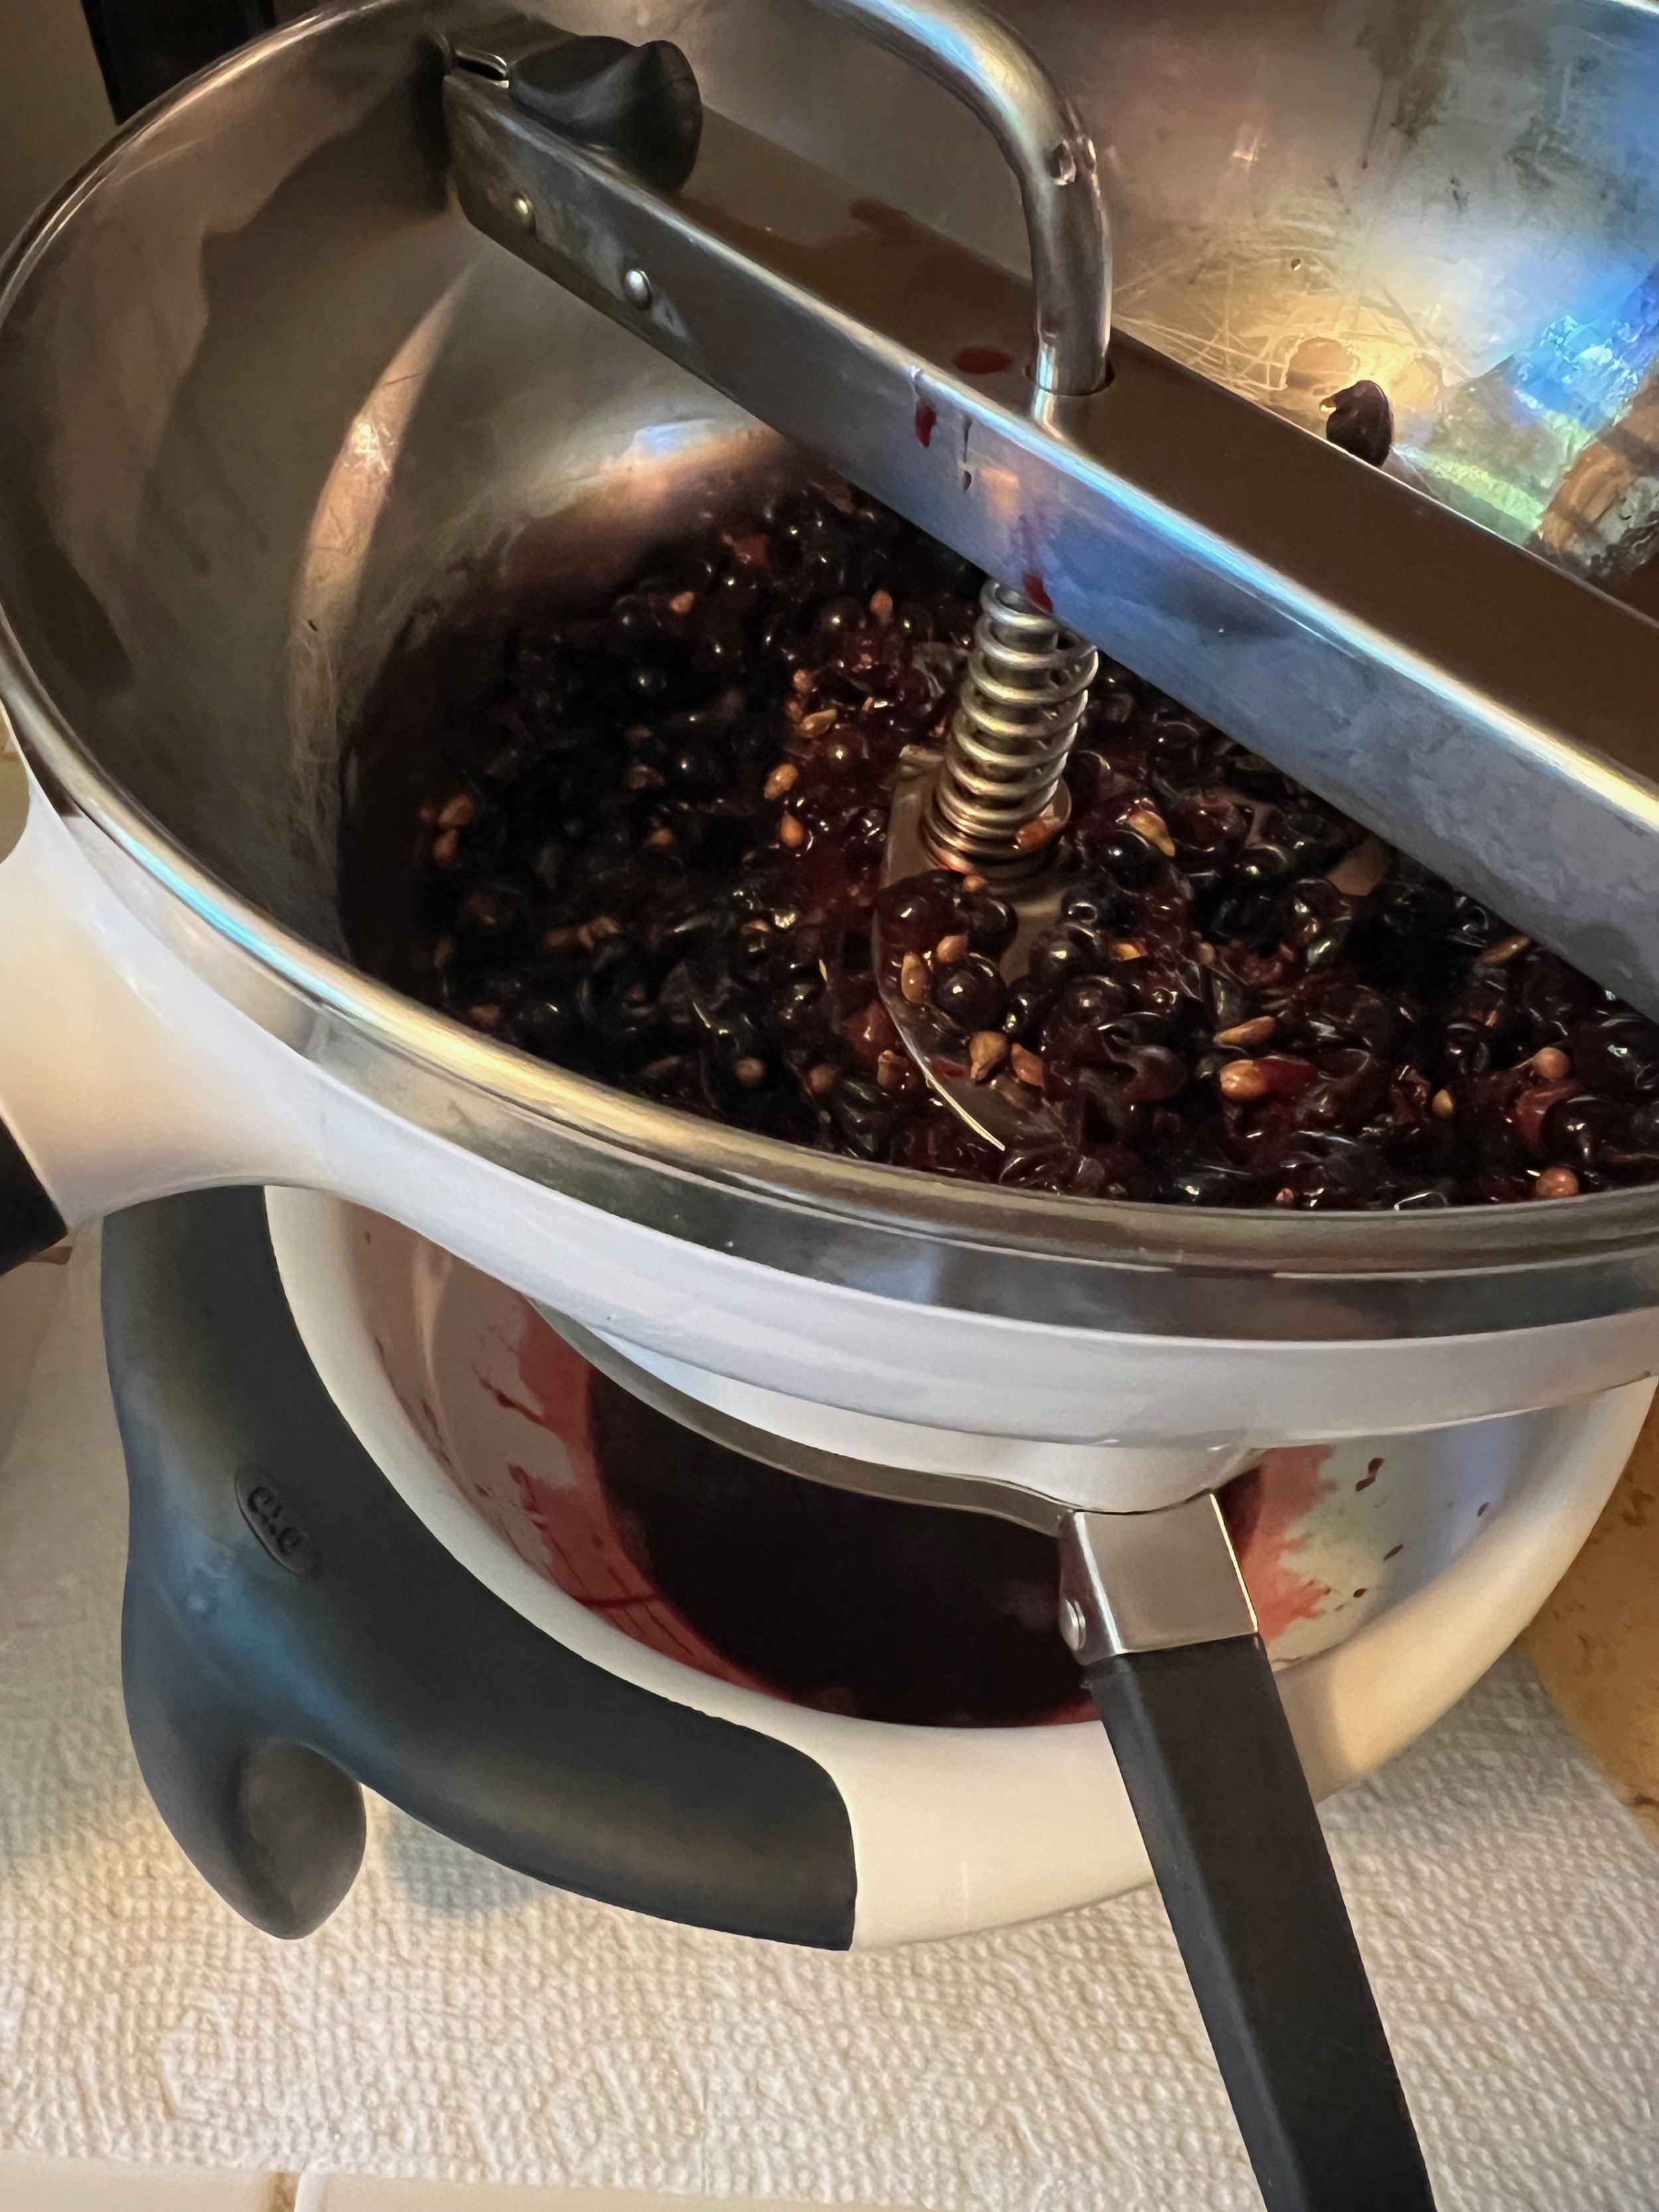
I looked up how to make grape juice in my trusty Ball Blue Book, and that advised washing the grapes, then crushing them, then heating the juice on the stove. This seemed backward to me. (Not the washing part; of course that should come first.) I thought about how to crush them; I had no interest in stomping them with my feet. I decided I would take the grapes off the stems, then heat them gently in my big Dutch oven on the stovetop, adding a little bit of sugar (no need to measure because I’m not water-bath or pressure canning this juice) and waiting until it dissolved and the grapes were nice and warm. Then I would put them through my food mill to remove the skins and seeds.

Well, taking the grapes off the stems took an hour in itself, and I only did a about a quarter of the grapes in the buckets before I decided I’d had enough of that. Heating them was interesting because they immediately started to release juice. Putting them through the mill was straightforward, though it took a bit of muscle because of those large seeds. The primary problem was the MESS. Purple juice everywhere! (I was glad I thought ahead and put on some old clothes.) Purple pulp everywhere!

But the smell, oh my heavens, the smell. I haven’t had grape juice since I was a child, and I found myself wondering why. Probably because the stuff in the store is too sweet and barely juice at all. But this! This smelled like the best fruit orchard in the world, rich and deep and sweet, and the color of the juice! It’s the most gorgeous deep dark red, like a jewel.

Tom and I had a little at dinnertime, and whoa - it is really amazing. Intense, aromatic, delicious, pungent, sweet - you can taste the antioxidants and vitamins! You don’t need more than a a quarter cup - it’s super concentrated!

This quart of juice came from probably only 1-2 pounds of grapes, yielding far more juice than I expected from these small fruits. I have a lot left to process, and am trying to convince myself to make jelly. When’s the last time you had grape jelly? When’s the last time you had HOMEMADE grape jelly??? (I don’t think I ever have.) I mean, it’s got to be delicious, right?

But the clean up…. I’m not sure I can bring myself to go through this process again. The pulp and seeds were easily disposed of (I took it to the chickens, who were very interested), but I had to be very careful not to accidentally put any of those seeds down the garbage disposal (they are the size of popcorn kernels!). I ended up rinsing all my equipment outside with the garden hose before bringing it back inside to wash properly. My counters were a mess, my sink looked like something had died, and my hands were completely stained.

But this stuff is so darn tasty, I might have to just go for it. The time, effort, and mess are the trade-off for an unexpected homemade treat from a successful garden crop.

Tags fruit garden, preserving, cooking
4 Comments

Green Garlic Puree

May 22, 2022 Elizabeth Boegel

I’ve written before about the difference in my two garlic beds. I planted Inchelium Red garlic last October as usual, but this time I split the crop into my two fire-ring beds. One bed had a cover crop of cilantro in with the garlic, and those bulbs grew tall and green and fat - and they are ‘curing’ in place now, without irrigation, filling out and waiting for harvest in early June. In the other bed, the garlic was alone, without a cover crop, and it didn’t do as well. The bulbs were short and measly, and didn’t seem to be getting any bigger. I decided to harvest it early and use it as green garlic. However, I couldn’t use it all at once, so I thought I might try to find a way to preserve it, long-term.

‘Green’ garlic is simply immature, taken out of the ground before the bulbs grow to a typical size. Interestingly, I discovered that many of the bulbs had already ‘headed up’ - that is, grown individual cloves, which you can see from the cross-section picture at the top of this post - but they were smaller than normal. However, many of the bulbs were simply one swollen clove, and had not yet headed up. Regardless of their size or development, I cut the green stalk off each one (which you can also use like scallions or chives) and let the small bulbs dry out on a paper towel inside for a couple of weeks. They were dirty, but as soon as they dried out, I could rub off the outer dirt and skin and reveal the clean, small bulbs underneath.

Then it was just a matter of peeling each one. Green garlic, being immature, doesn’t get all papery like mature garlic does; this means the peels are still quite moist and easy to take off. I decided to make a puree of the cloves with olive oil, and freeze them in cubes to use in cooking later. You cannot store garlic in oil in the fridge, because of the risk of botulism. The USDA Center for Food Preservation recommends storing garlic in oil in the freezer. Here is their blurb about that:

“Garlic-in-Oil

Research performed by the National Center for Home Food Preservation confirmed that mixtures of garlic in oil stored at room temperature are at risk for the development of botulism.

Garlic-in-oil should be made fresh and stored in the refrigerator at 40°F or lower for no more than 4 days. It may be frozen for long term storage for up to several months. Package in glass freezer jars or plastic freezer boxes, leaving ½-inch headspace. Label, date and freeze.”

Blending the garlic with oil was easy, and it made a pretty yellow puree, which I then decanted into an ice cube tray and put in the freezer. This amount yielded only 7 large cubes. Granted, they are pungent and will certainly pack a punch in any recipe. How handy to be able to take a cube out of the freezer, toss it in the frying pan, and have a lovely flavored oil in which to cook a mess of greens, or meat, or eggs. They could also be defrosted to make salad dressing (though it would be strongly-flavored!).

Nothing we grow in the garden should go to waste. There is always a use for it, and if not in the kitchen, it can be fed to livestock or added to the compost pile, where it goes back to feeding the next crop.

Tags garlic, cooking, preserving
2 Comments

Freezing Peas

April 11, 2021 Elizabeth Boegel
IMG_6815.jpeg

I can’t think of a better spring supper than peas, briefly warmed in a saucepan with salted butter.

I have realized something. Every vegetable, every fruit, and every flower, is my favorite on the day when they are at their peak. One day asparagus might win the prize, the next it might be a tomato or a dahlia. I just can’t pick a favorite, so I will have a different favorite every single day.

And today, peas win.

IMG_6814.jpeg

Food production has not been a sure thing the past eight months in our garden, but one thing that’s done quite well is shelling peas. With one kid away at college, we are picking far more than we need. So for the first time ever, I can freeze some for the off-season!

The National Center for Food Preservation recommends blanching the shelled peas for 30 seconds in boiling water, then draining and freezing them in jars. So, that’s what I did! It could not be more simple. I’m excited to have sweet peas for the off-season, either to eat plain, or in one of our favorite dinners, pasta carbonara. Peas are not authentic to this dish, but we love them here.

Pasta Carbonara ala Poppy Corners

1 lb. pasta (we prefer thick long noodles for this, like linguine)
1 lb. bacon (preferably pastured), chopped
1-2 cups peas (fresh or frozen)
3 cloves garlic, minced
2-3 eggs (as fresh as possible)
1 C parmesan (plus more for serving), finely shredded
salt and pepper

Get some water heating for pasta.

In a very large skillet, cook the bacon until crisp and all the fat has rendered. Do not drain. Add the garlic and fry for 30 seconds until fragrant. Add the peas, and turn the burner down to simmer. Let that go for a bit.

In a large bowl, whisk the eggs with the parmesan. If you have very large eggs, two will be enough. For smaller eggs, use three. Add salt and pepper. Set aside.

Cook the pasta according to package directions. When cooked al dente, drain, then add to skillet with pea mixture and toss pasta so that every strand is coated with bacon drippings, garlic, peas, and bacon.

Add a scoop of the hot pasta mixture to the egg mixture, stirring vigorously (you want the eggs to warm up without cooking. This is not pasta with scrambled eggs!). Add a little bit more of the pasta, stirring all the while, until all the pasta is in and mixed.

Serve in large bowls with extra parmesan.

IMG_6816.jpeg
Tags vegetable garden, cooking, seasonal recipes, preserving
2 Comments

Homemade Garlic Powder

February 15, 2021 Elizabeth Boegel
IMG_6288.jpeg

2020 had one thing going for it: We had an absolutely perfect garlic crop. I had finally perfected our method of growing garlic and it yielded beautiful, plump garlic bulbs, with juicy, succulent cloves. We’ve enjoyed it fresh ever since we harvested it. But then it did what garlic naturally does after a certain amount of time - it began to bolt and grow. We don’t have a root cellar, so storing garlic in ideal temperatures/humidity is just not possible for us; eventually it’s just going to turn, and there’s nothing to be done about that.

Garlic that has bolted (started sending up new growth) is still safe to eat, as long as the cloves are still firm. However, you need to cut out the growing shoot before using it, as that part will be bitter. Also, inevitably, the shoot will use up all the sugars in the clove, leaving it mushy and tasteless. So it’s a careful dance, knowing when to stop using your garlic harvest.

We knew that we wanted to get ahead of the mushy-clove stage, so this past weekend, we made garlic powder with the remaining bulbs. I cut down all five of the strings of garlic still hanging over the piano. I kept two big bulbs to try another experiment; planting them now, in pots, to see if I can get a fall crop of garlic on top of our already-growing spring crop (planted last October). I’ll let you know how that goes. I also removed the firmest two heads and popped them in the fridge, hoping to halt their growth and allow them to be used in cooking a bit longer. The rest of them were separated into cloves, shaken together in two identically-sized cake tins to remove their skins, and then sliced in half to remove the growing shoots.

IMG_6296.jpeg

Then, the cleaned cloves were put into the food processor in batches and chopped up. We spread the mixture on dehydrator sheets and dried it for about 20 hours. I wish you could have smelled our house while that was happening. Truly, I felt like we were in the middle of some kind of spice factory. At first, it was so strong, it made our eyes water; after a few hours, the scent changed to something sweeter and mellower, but still plenty strong. It’s a really good thing we had already planned on Italian for dinner, as this smell fitted right in!

before drying

before drying

after drying for 20 hours

after drying for 20 hours

After that, it was just a matter of peeling the dried puree off the sheets and popping it into our dedicated spice grinder. It ground up beautifully into a soft, creamy powder, and yielded an entire pint! That’s enough powdered garlic to see us through a year, at least.

IMG_6304.jpeg
IMG_6305.jpeg
IMG_6307.jpeg

This project took a lot of time, but we are so glad we were able to use up the rest of our beautiful garlic harvest in a sustainable way. It feels right, and honors the time, money, and effort it took to grow the crop in the first place. Nothing is as rewarding to grow as a staple like garlic, which is used so often in our cooking.

Have you ever dried your garlic crop? Have you ever planting sprouting cloves in the spring for a fall crop? If so, I’d like to know how your efforts turned out!

Tags garlic, projects, preserving, vegetable garden, herb garden
2 Comments

Kitchen Days

July 19, 2020 Elizabeth Boegel
Tomato picking at sunset, the pleasantest time of the day

Tomato picking at sunset, the pleasantest time of the day

These are the kitchen days - days where we turn on the fan, heat up the oven, get out the food processor, the canning rig, the jam pot, the pickling salt.

IMG_4924.jpg

Every extra moment filled with processing and cooking. Tomatoes into puree, salsa, paste. Peppers roasted and into the freezer.

IMG_4927.jpg

Basil blended with garlic, walnuts, salt, parmesan, and olive oil. Pesto in little jars, into the freezer.

IMG_4928.jpg

Cucumbers, picked when small, fermented into half-sour dills, or sliced and canned for bread n’ butter pickles.

IMG_4934.jpg

Warm squishy berries picked in the hot sun, then cooked down with sugar into jam.

IMG_4937.jpg

It’s hot work, and it’s persistent work. But our winter selves will thank us for doing it. Our stores are filling up! And tomorrow there will be more to pick….

Tags vegetable garden, fruit garden, herb garden, preserving, canning, cooking
Comment
Older Posts →

Subscribe

Sign up to get email when new blog entries are made.

We respect your privacy. We're only going to use this for blog updates.

Thank you! Please check your email for a confirmation notice to complete the subscription process.

Powered by Squarespace