Another guest post from Tom about construction...
*******************************
One of our plans for this year was to raise the height of the fence that surrounds the yard, so that we could grow more food for us and less for our local deer population. This past weekend we finished the last part of that work, installing new and higher gates.
The work to make new gates gave me an opportunity to work with Elizabeth's dad Tim Killen, who comes from a line of woodworkers and who blogs for Fine Woodworking. Tim's focus for a number of years has been in using SketchUp, 3-D modeling software, to plan his woodworking pieces. I'd dabbled a little bit with SketchUp, but I've always found that having a specific project is always a good way to learn software. This gate project would be a perfect opportunity.
After a few fits and starts and YouTube tutorials, I was able to work up a model for the gates:
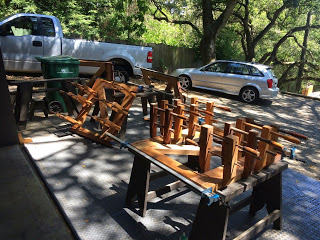
We had some lumber left over from the chicken coop construction project, and used that to form the main frames of the gates. Working with Tim gave me a chance to try making some mortise and tenon joints, and at one point we used nearly every clamp that he had:
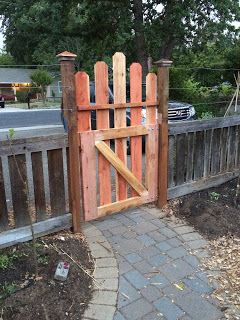
The final gate design looks a little different than the model I'd created, as we simplified the work needed to make the pickets that attached to the frames.

The gates wound up being pretty heavy, so I was glad that I'd followed Tim's advice and ordered some pintle hinges online to hang the gates. Pintle hinges come in two parts -- there's a metal strap that attaches to the gate using carriage bolts, and a pin (the pintle) that gets screwed into the post. The gate is then lowered into position so that a loop on the end of the straps goes over the pintle. Here's a closeup:
We used two straps per gate, and each one is rated to 100 lbs, so that should hold up. Here's one of the finished gates in place:

It was a lot of fun working with Tim on the gates, and I learned a lot (like, when you subtract off the width of the stiles when measuring your rails, be sure to add back in the length of the tenons, or your gate frames will be a lot more narrow than you had planned. D'oh!).
Our other construction project of last weekend was for an Eco-project for Adam's 7th grade science class. For this project, he needed to make something that would contribute to an environment. We've been working on making our home environment a better place for animals, both wild (birds, insects, lizards) and domestic (chickens, bees), and so we decided to follow that same path and work on a bat box.
There are a lot of plans for bat boxes online, and the construction is pretty straightforward. We settled on a design from This Old House that has a fun bat motif. The box itself has an opening on the bottom, and is fairly shallow – only about 3/4" between front and back.

Adam has to bring it in to school next week, then we'll put it up high on our shed.
*******************************
One of our plans for this year was to raise the height of the fence that surrounds the yard, so that we could grow more food for us and less for our local deer population. This past weekend we finished the last part of that work, installing new and higher gates.
The work to make new gates gave me an opportunity to work with Elizabeth's dad Tim Killen, who comes from a line of woodworkers and who blogs for Fine Woodworking. Tim's focus for a number of years has been in using SketchUp, 3-D modeling software, to plan his woodworking pieces. I'd dabbled a little bit with SketchUp, but I've always found that having a specific project is always a good way to learn software. This gate project would be a perfect opportunity.
After a few fits and starts and YouTube tutorials, I was able to work up a model for the gates:
 |
| Front View |
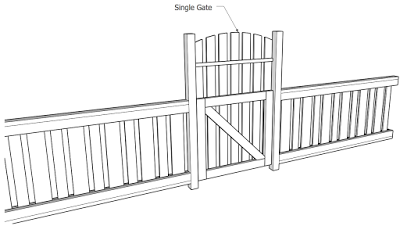 |
| Rear view |
We had some lumber left over from the chicken coop construction project, and used that to form the main frames of the gates. Working with Tim gave me a chance to try making some mortise and tenon joints, and at one point we used nearly every clamp that he had:
The gates wound up being pretty heavy, so I was glad that I'd followed Tim's advice and ordered some pintle hinges online to hang the gates. Pintle hinges come in two parts -- there's a metal strap that attaches to the gate using carriage bolts, and a pin (the pintle) that gets screwed into the post. The gate is then lowered into position so that a loop on the end of the straps goes over the pintle. Here's a closeup:
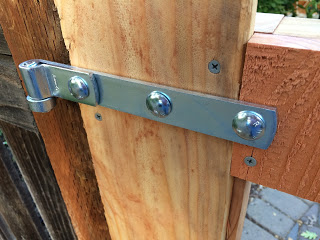 |
| Pintle hinge |
It was a lot of fun working with Tim on the gates, and I learned a lot (like, when you subtract off the width of the stiles when measuring your rails, be sure to add back in the length of the tenons, or your gate frames will be a lot more narrow than you had planned. D'oh!).
Our other construction project of last weekend was for an Eco-project for Adam's 7th grade science class. For this project, he needed to make something that would contribute to an environment. We've been working on making our home environment a better place for animals, both wild (birds, insects, lizards) and domestic (chickens, bees), and so we decided to follow that same path and work on a bat box.
There are a lot of plans for bat boxes online, and the construction is pretty straightforward. We settled on a design from This Old House that has a fun bat motif. The box itself has an opening on the bottom, and is fairly shallow – only about 3/4" between front and back.
Adam has to bring it in to school next week, then we'll put it up high on our shed.